When you implement a Websense proxy solution and you don’t guy one of their appliance then you have to setup the proxy components yourself. This can be fairly easily done on a CentOS install running on VMWare or Hyper-V. This how to will walk you through getting a Websense Content Gateway (otherwise known as a WCG) with version 8.0.1 on an appropriate virtual host.
One word of warning, you can ONLY use CentOS version 6.5 for this, no other versions of CentOS will work. Websense is very particular about kernel versions, so you probably won’t want to update your CentOS install either. Go and grab yourself a CentOS 6.5 ISO if you don’t already have it.
Although these notes are for Websense version 8.0.1 these notes should be fairly relevant for most modern-ish versions of Websense.
Create your virtual machine in your preferred virtualisation machine, when I set these up I tend to use the following requirements:
- 8 GB RAM
- At least 2 cores, preferably 4
- 40GB HDD for operating system
- 20GB HDD for cache – Optional
- Network Interface for requests
- Network Interface for Heartbeat – Optional if we want a cluster
For this tutorial I will assume the following:
- Websense TRITON server is running at 192.168.100.50/24 as triton.companya.local
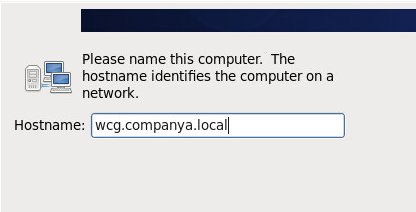
- Websense Content Gatway is going to be on 192.168.100.100/24 as wcg.companya.local
- Gateway is 192.168.100.1/24
- DNS Server is 192.168.100.40/24
Installation of CentOS
We probably want to make some sensible changes while we’re setting up the operating system. Run through the installation and make sure you do the following.
In the hostname make sure you input the full and proper FQDN which is already setup in DNS, for our setup this should look like the below.
Once we have the hostname we want to make sure we setup networking properly, click on “Configure Network” and fill it in as per your details. Make sure you tick the “Connect Automatically” option box and fill in all the pertinent details.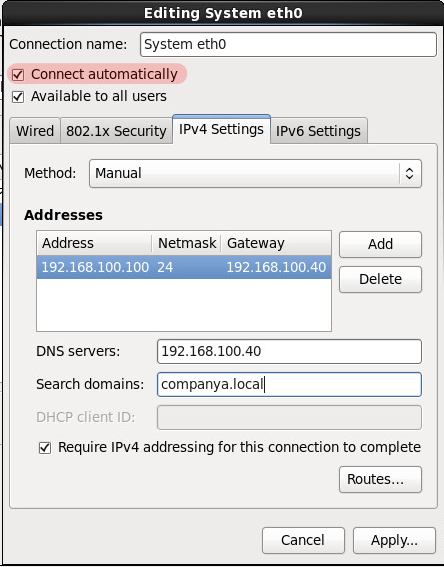
For the timezone make sure you select the correct timezone for your management server, if you can use NTP use NTP. The times have to be accurate between all the Websense components.
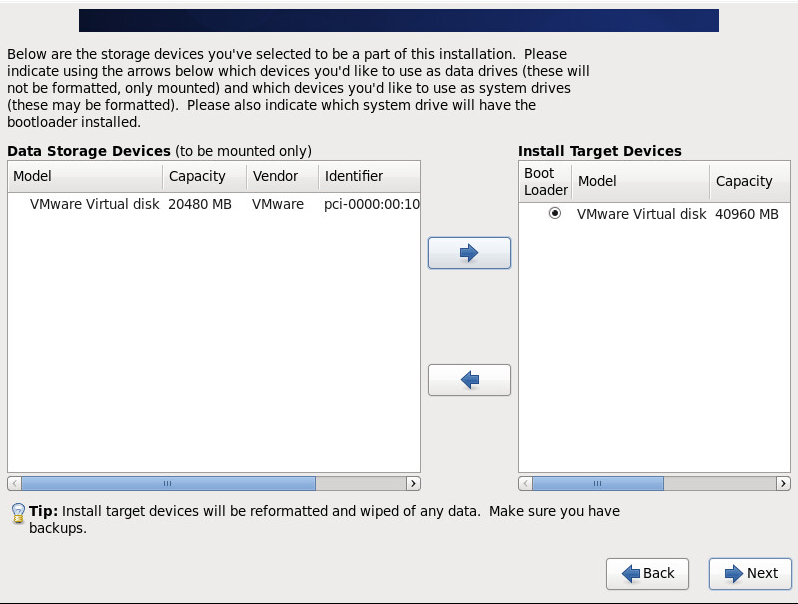
When picking which disks to install to make sure you select the correct disk and leave the other completely untouched, in my example my screen looks like the following. This lets the installation install to the larger drive and it will leave our cache disk available to use during the Websense install.
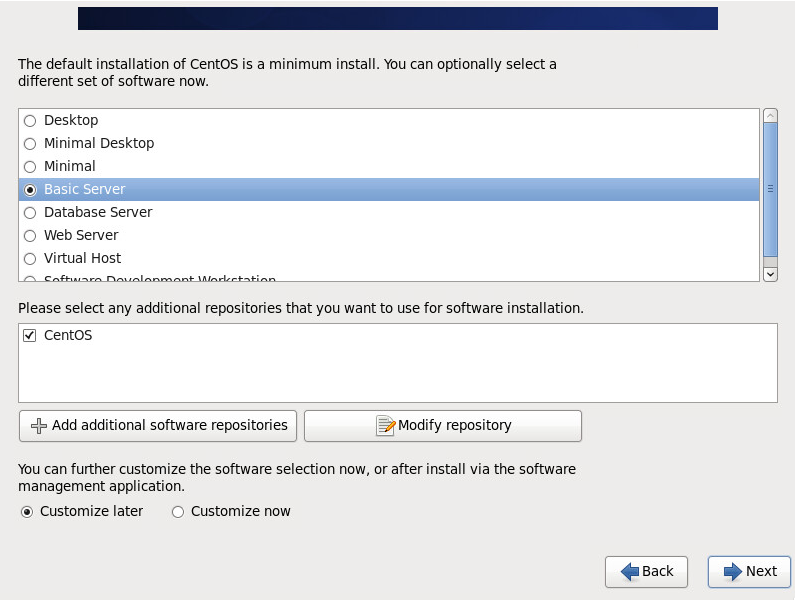
When picking what packages to install I tend to go for a basic server.
Then let the installation do it’s thing, and after a while you should be looking at an logon prompt.
Installation of Content Gateway
From here you should be able to SSH to your new server, there are a few things we need to do before we even think about installing the Websense components. As I mentioned at the beginning of this tutorial do NOT update your installation at this point.
Firstly lets wipe our firewall settings and make sure we have a blank slate.
iptables -F && iptables-save > /etc/sysconfig/iptables
Now we need to disable SELinux.
sed -i -- 's/SELINUX=enforcing/SELINUX=disabled/g' /etc/sysconfig/selinux
Next we need to setup the hosts file in a specific way.
echo `ifconfig eth0 2>/dev/null|awk '/inet addr:/ {print $2}'| \
    sed 's/addr://'` ' ' $HOSTNAME | \
    cat - /etc/hosts > /root/temp_hosts && mv -f /root/temp_hosts /etc/hosts
Lastly we will install some dependencies for the content gateway.
yum install -y apr apr-util compat-readline5 ftp gd libicu nc \
    ncurses-devel readline-devel tcl libXpm
Now lets make sure our time and date settings are accurate.
ntpdate pool.ntp.org
We’re done with that lot, I like to give the content gateway a reboot.
shutdown -r now
If you logon to your “My Websense” you should be able to download installation files, you’re looking for one which looks something along the lines of “Setup_Lnx”, in my example we’ll be using “WebsenseCG801Setup_Lnx.tar.gz”. At this point I tend to download the WCG installation file somewhere where I can get at it with a standard WGET command, or if needed I can SFTP them onto the newly created content gateway.
So if I have the tar file hosted on my DNS server I will type something in like this:
wget http://192.168.100.40/WebsenseCG801Setup_Lnx.tar.gz
Regardless of who you got the file onto your server you now need to uncompress it.
tar zxvf WebsenseCG801Setup_Lnx.tar.gz
Once that’s done we’re ready to install!
Run the following command.
sh wcg_install.sh
Once you’ve read each page of the license agreement, press “y” to accept it.
On the next screen type in the password you want to use to manage this content gateway, note you will not see the cursor moving whilst you are setting the password. This is the password you’ll use when you need to access the Content Gateway Manager (ie in my example https://192.168.100.100:8081).
---------------------------------------------------
Websense Content Gateway Administration Information
---------------------------------------------------
Enter the administrator password for the Websense Content Gateway
management interface.
Username: admin
Password:>
Confirm password:>
Type in the email you’ll want to use for alerts and the like, this can be changed later on but is useful for password resets and the like.
Websense Content Gateway requires an email address for alarm notification.
Enter an email address using @ notation: [] > [email protected]
On the policy server option you’ll probably want to populate this with your Triton management server address, so in our example this will look like the following.
Websense Content Gateway Integrations Configuration
---------------------------------------------------
Enter the Policy Server IP address (leave blank if integrating with Data Security only): [] > 192.168.100.50
Ditto for the filtering service, this will probably be the same management server.
Enter the Filtering Service IP address: [192.168.100.50] >
Accept the default ports (unless you really want to change them) by pressing enter.
Port Assignments:
-----------------
'1'  Websense Content Gateway Proxy Port  8080
'2'  Web Interface port                   8081
'3'  Auto config port                     8083
'4'  Process manager port                 8084
'5'  Logging server port                  8085
'6'  Clustering port                      8086
'7'  Reliable service port                8087
'8'  Multicast port                       8088

Enter the port assignment you would like to change:
'1-8' - specific port changes
'X'   - no change
'H'   - help
[X] >
If we’re using our WCG as a cache we will need to point it at our unused HDD in the next steps by pressing “y”
Websense Content Gateway Cache Disk Configuration
-------------------------------------------------
Would you like to enable raw disk cache [y/n]? y
We’re going to tell Websense we want to use all of the disk to use as a cache, obviously your options may be different. Press “S” to enable all the disks.
Select available disk resources to use for the cache.  Remember
that space used for the cache cannot be used for any other purpose.

Here are the available drives
[ ] (1) /dev/sdb 21474836480 0x0

Choose one of the following options:
'A'   - Add disk(s) to cache
'R'   - Remove disk(s) from cache
'S'   - Add all available disks to cache
'U'   - Remove all disks from cache
'X'   - Done with selection, continue Websense Content Gateway installation.

Option: > S
You should be given a screen which looks like this, press “X” and then enter to continue.
Here is the current selection
[X] (1) /dev/sdb 21474836480 0x0

Choose one of the following options:
'A'   - Add disk(s) to cache
'R'   - Remove disk(s) from cache
'S'   - Add all available disks to cache
'U'   - Remove all disks from cache
'X'   - Done with selection, continue Websense Content Gateway installation.

Option: > X
The next options asks if you would like to provide automatic feedback to Websense, my personal advice is to allow this communication. It will help you in the long run and is highly recommended.
Websense Content Gateway Optional Feedback Configuration
--------------------------------------------------------
Websense Content Gateway has the ability to send usage statistics,
information about scanned content and activated product features to
Websense Inc. for the purpose of improving the accuracy of scanning,
filtering and categorization.

Would you like to allow this communication with Websense, Inc. ? [y/n] y
The final screen tells us that it’s ready to install. Since we’ve been through all the options diligently we’re reading to install. Press “y” and hit enter.
You should then see plenty of activity going on and it can take a good few minutes to set everything up.
Once complete leave it half an hour or so and it should appear in your Triton console under Web – Settings – Content Gateway Access.
Congratulations you’ve now created your own content gateway!


2 Comments
Good article.
Thanks, glad you found it useful.