
How to Create a Site to Host VPN on Ubuntu for AWS, Azure and Linode with pfsense
This tutorial will guide you through setting up a VPN from your pfsense firewall router, to your Ubuntu server hosted in the cloud. Many of these vendors have the capability to setup a site to site VPN through the control panels, but this tutorial doesn’t require anything except for an external IP address on your Linux box.
We will be using the firewall pfsense and Ubuntu 14.04 with StrongSwan. But saying that this tutorial should work fine with the likes of RedHat, CentOS, Debian Suse, etc. It should also work ok with a different firewall as long as we can tell the device to use a remote public IP as the end point! I spun this up successfully using pfSense on 2.2.4.
But why would you want to create a VPN which is in essence the opposite way round to most IPSec VPNs? Well, within your hosted server you could include ACLs to allow access only to your backend network, and you can see auditing information in those logs for who access what when and where. You may also want to make sure that communications are encrypted across non-secure protocols (such as Telnet).
For this example we are going to assume the following IP addresses:
- Cloud Server – Ubuntu – 100.100.100.200
- Office Firewall External IP – pfSense – 100.100.100.100
- Office Firewall Internal IP – pfSense – 192.168.0.1
- Office LAN – 192.168.0.0/24
WARNING: Since you are telling two devices to only communicate through an IPSec tunnel you will likely lose SSH connectivity to your remote SSH box at some point in this tutorial. This is perfectly normal don’t panic. If it doesn’t work as you’re expecting you may need to disable the IPSec tunnel on the pfSense firewall to regain connectivity to your Ubuntu server in the cloud. It may also make a great deal of sense to have another way to connect to your Ubuntu server not via your pfSense box (3G modem, other jump box, etc), this makes troubleshooting much easier!
Ubuntu Server Setup
Lets install StrongSwan on our Linux machine:
apt-get install ipsec-tools strongswan-starter
Now we need to edit the ipsec.conf file
nano /etc/ipsec.conf
Edit it accordingly by adding the network-to-host section:
conn %default
    keyexchange=ikev2
conn network-to-host
    auto=route
    left=100.100.100.200      #This is your WAN IP of the server
    right=100.100.100.100     #This is your WAN IP of your firewall
    rightsubnet=192.168.0.0/24
    authby=secret
[ctrl]+o to save, [ctrl]+x to exit.
Now we need to setup the pre-shared key.
nano /etc/ipsec.secrets
Add the following line:
100.100.100.200 100.100.100.100 : PSK “Your password here!"
[ctrl]+o to save, [ctrl]+x to exit.
Now restart IPSec:
ipsec restart
pfSense Setup
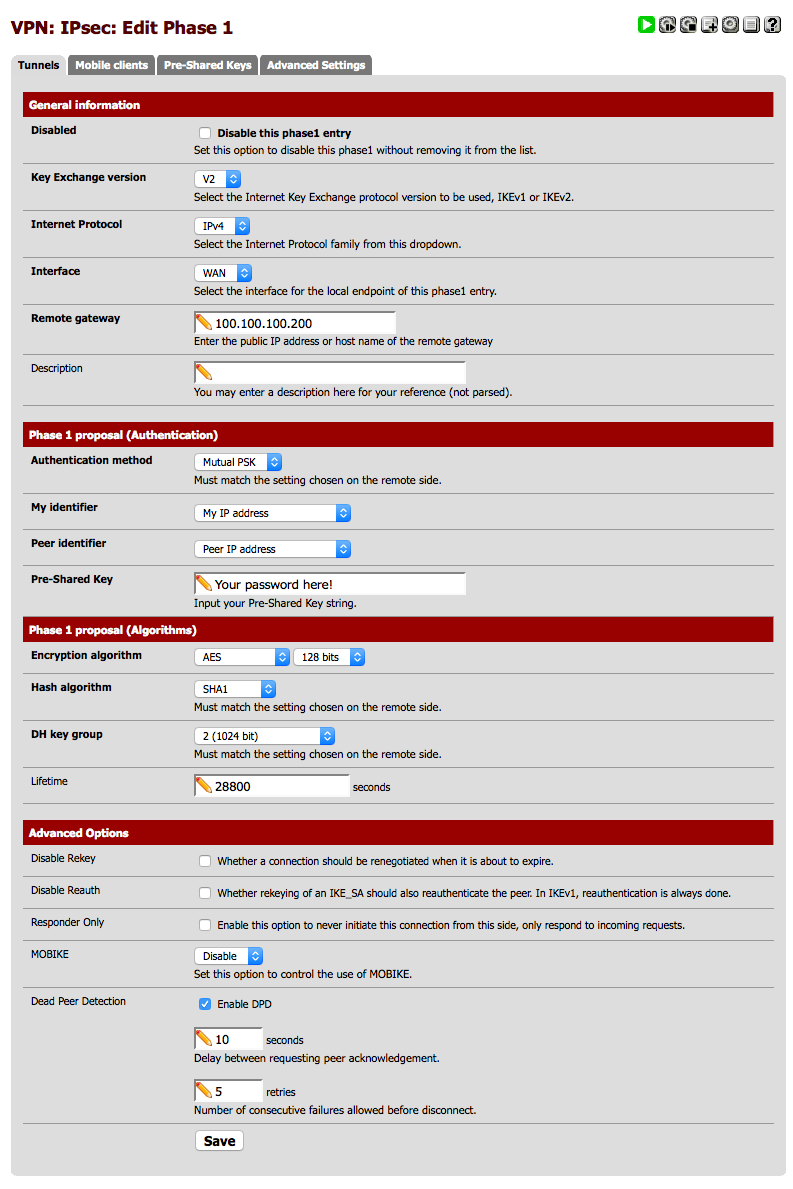
Now logon to your pfSense firewall, you will want to click on VPN then IPSec and on the Tunnels tab, click on the Add icon. Enter your settings like the below, just make sure you change the IP addresses for your setup.
Now we need to add our Phase2, so go back to VPN – IPSec and click on the + icon again to add the settings as below.
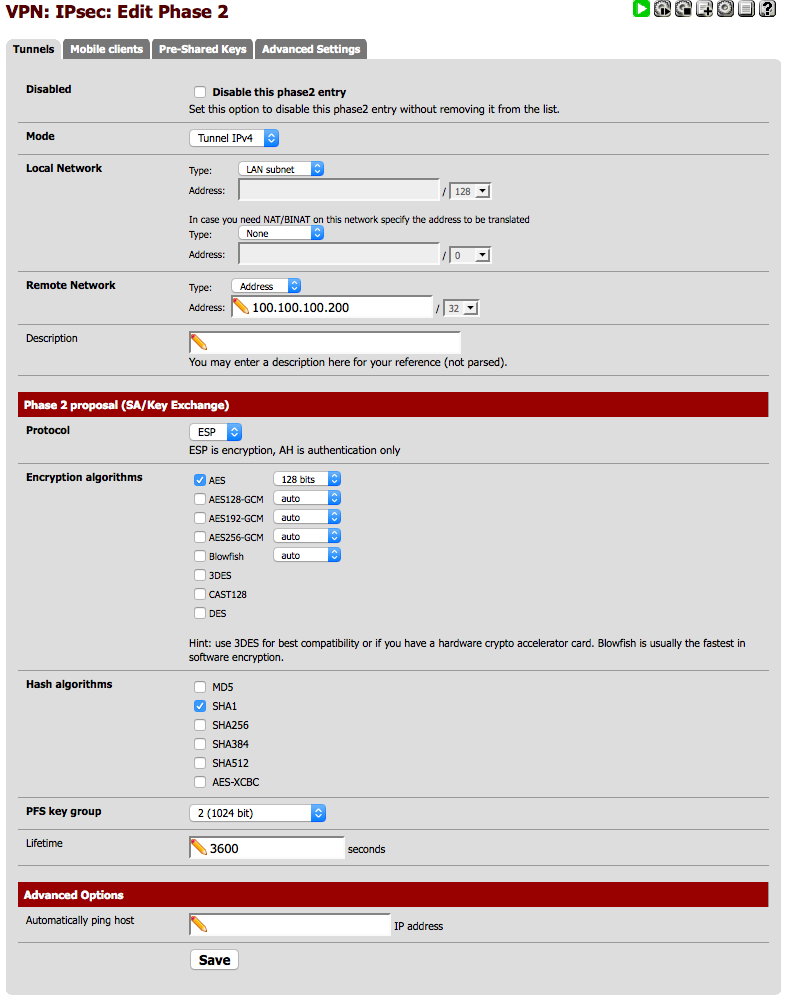
Click Save, and pfSense will probably tell you that you need to apply the config, so go ahead and click Apply.

Now we will need to add in an IPSec firewall rule to allow our remote host to talk to our local network. Click on Firewall – Rules and IPSec, you will probably want to create two rules which look like the following.
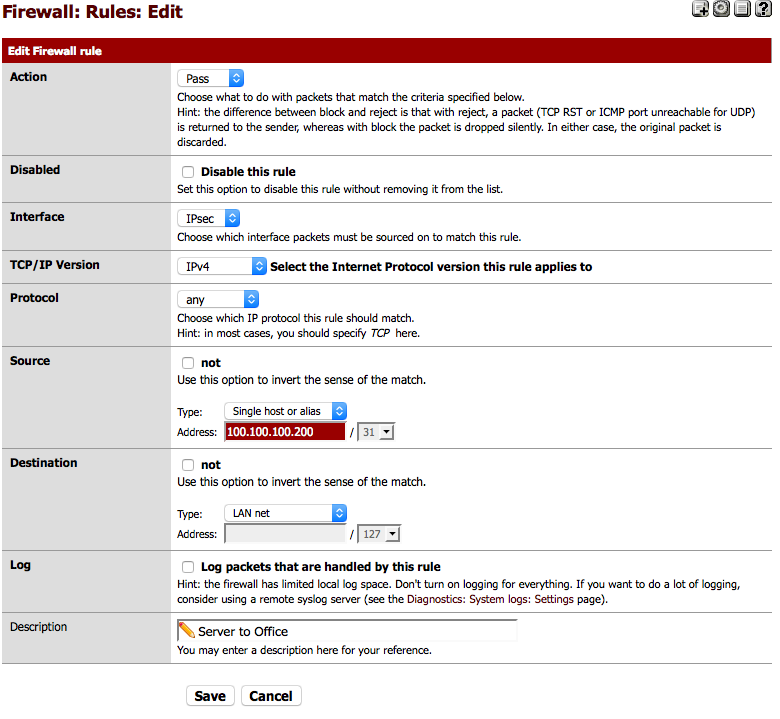
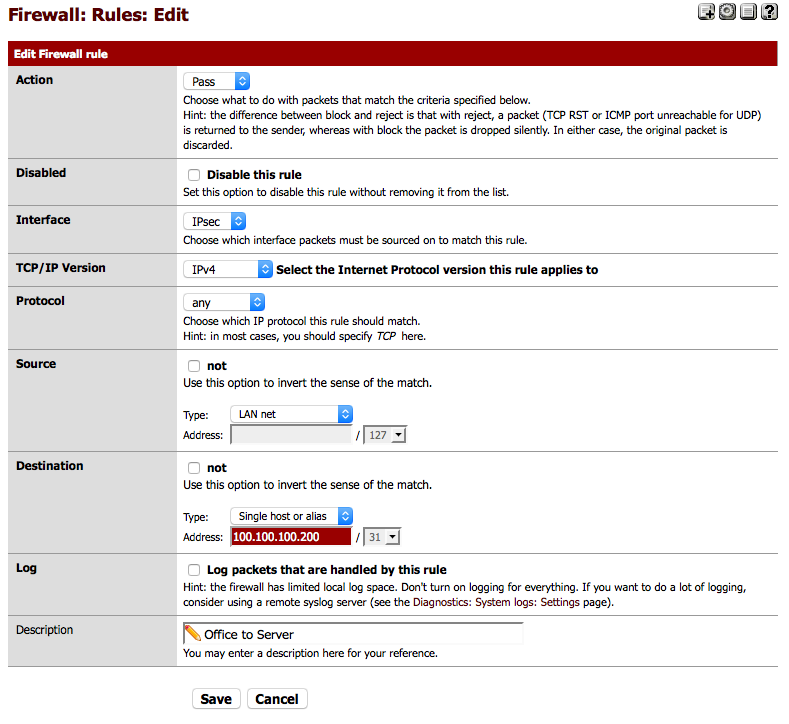
Click Save when you’re done and pfSense should tell once again you once again to apply the settings, go ahead and click on Apply.

Testing
If you’ve followed all these instructions you should be able to bring up an IPSec tunnel between your pfSense firewall and your remote Ubuntu server. On the pfSense firewall click on Status – IPSec and you should hopefully have a screen that looks like the following.
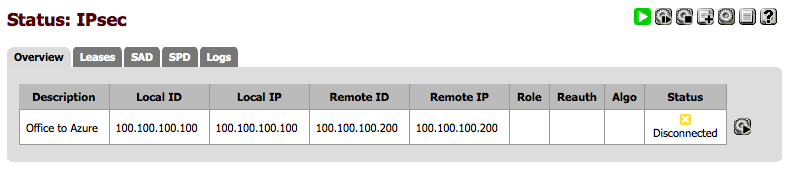
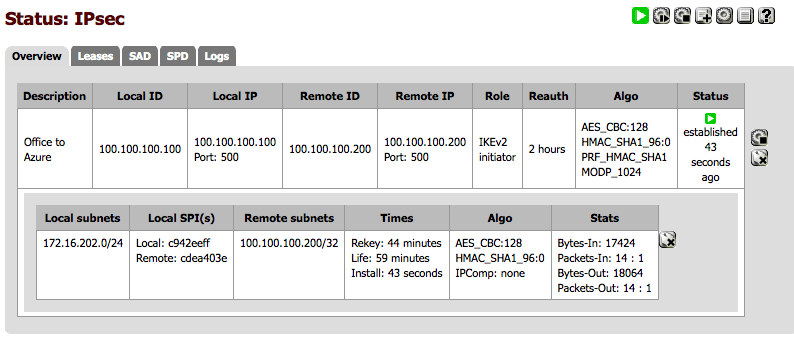
Dependant on what it says under “Status” you may have to click the play button, then the screen should look like this. Or you could try pinging your remote server and that should bring up the tunnel too.
If you SSH onto your Ubuntu box and type in:
ipsec statusall
You should see some output like this:
Status of IKE charon daemon (strongSwan 5.1.2, Linux 3.13.0-24-generic, x86_64):
  uptime: 25 minutes, since Oct 03 14:43:43 2015
  malloc: sbrk 1486848, mmap 0, used 342928, free 1143920
  worker threads: 11 of 16 idle, 5/0/0/0 working, job queue: 0/0/0/0, scheduled: 4
  loaded plugins: charon test-vectors aes rc2 sha1 sha2 md4 md5 random nonce x509 revocation constraints pkcs1 pkcs7 pkcs8 pkcs12 pem openssl xcbc cmac hmac ctr ccm gcm attr kernel-netlink resolve socket-default stroke updown eap-identity addrblock
 Listening IP addresses:
  100.100.100.200
 Connections:
  network-to-host:  100.100.100.200...100.100.100.100  IKEv1/2
  network-to-host:   local:  [100.100.100.200] uses pre-shared key authentication
  network-to-host:   remote: [100.100.100.100] uses pre-shared key authentication
  network-to-host:   child:  dynamic === 172.16.202.0/24 TUNNEL
  Routed Connections:
  network-to-host{1}:  ROUTED, TUNNEL
   network-to-host{1}:   100.100.100.200/32 === 172.16.202.0/24
   Security Associations (1 up, 0 connecting):
   network-to-host[2]: ESTABLISHED 5 minutes ago, 100.100.100.200[100.100.100.200]...100.100.100.100[100.100.100.100]
   network-to-host[2]: IKEv2 SPIs: 6e9862c3772bdab8_i 14ae8649db7acc46_r*, pre-shared key reauthentication in 2 hours
   network-to-host[2]: IKE proposal: AES_CBC_128/HMAC_SHA1_96/PRF_HMAC_SHA1/MODP_1024
   network-to-host{1}:  INSTALLED, TUNNEL, ESP SPIs: cdea403e_i c942eeff_o
   network-to-host{1}:  AES_CBC_128/HMAC_SHA1_96, 386326 bytes_i (185 pkts, 0s ago), 385886 bytes_o (161 pkts, 4s ago), rekeying in 37 minutes
   network-to-host{1}:   100.100.100.200/32 === 172.16.202.0/24
If you do that’s a good thing! But you could also try pinging across the VPN.
ping -s 4048 192.168.0.1
If you see a response then you’ve now got a working IPSec tunnel! Well done!
PING 192.168.0.1 (192.168.0.1) 4048(4076) bytes of data.
 4056 bytes from 192.168.0.1: icmp_seq=1 ttl=64 time=0.735 ms
 4056 bytes from 192.168.0.1: icmp_seq=2 ttl=64 time=0.639 ms
 4056 bytes from 192.168.0.1: icmp_seq=3 ttl=64 time=0.649 ms
 4056 bytes from 192.168.0.1: icmp_seq=4 ttl=64 time=0.706 ms
If you have any issues feel free to drop a comment below, will happily try and help.


7 Comments
This article was very helpful, thanks!
pfsensetoubuntu 192.168.80.90 192.168.80.90 192.168.80.88 192.168.80.88 IKEv2
initiator 8137 seconds (02:15:37) AES_CBC
HMAC_SHA1_96
PRF_HMAC_SHA1
MODP_1024 ESTABLISHED
1579 seconds (00:26:19) ago
Glad you found it useful 🙂
Gyp
nice article, it was very helpful!
i manage to setup ipsec connection between my home and office network.
the only think that was not able to do is configure site to site connection, at the moment i’m able to ping all clients from home to office, but from office i’m able to ping all clients from ipsec system.
if i try to ping from a clients that is connected to the ipsec server i will get time one.
at the office i have a centos box with strongswan.
i was not able to route my internal traffic via vpn for my home network 🙁
can you help me with this?
thanks.
Hi Vukomir,
Thanks for dropping by and apologies for my very delayed response, it’s been an incredibly busy week.
Sounds like quite an interesting use case. On the CentOS server if you run:
ipsec statusallWhat does that show?
Gyp
Cool! I am to ping machines on my internal LAN network from my Ubuntu VM in the cloud.
How can I set this up so that my LAN network’s outbound connections go out through my Ubuntu VM? So that when I go to Google on one of my LAN networked machines, it appears to Google to be coming from my Ubuntu VM’s IP address?
Hey, I figured it out. Added “leftsubnet=0.0.0.0/0” to /etc/ipsec.conf and in Phase 2, I set Remote Network to 0.0.0.0/0 as mentioned here: https://doc.pfsense.org/index.php/Routing_internet_traffic_through_a_site-to-site_IPsec_tunnel
Hi Robert,
Thanks for dropping by! Well done you cracked it 🙂
Gyp