In a corporate environment shared key encryption is rarely used due to the problems associated with distributing the appropriate keys. In the corporate wireless world many organisations prefer to use 802.1x or Radius authentication so that their users can log on to the wireless networks with their domain credentials.
I was recently asked to set up just s system with Unifi access points and controllers on Windows Server 2012 with Microsofts own Radius solution NPS (or Network Policy Server) and 802.1x. There is plenty of information out there but I found that some of it was out of date and others were missing some fairly key components. So I present this tutorial to hopefully helps others get this up and running as quickly as possible.
The Unifi system was running 4.8.18, and obviously may change a little as things progress. The network I was working on looking like the following:
- Windows Server 2012 Active Directory – 192.168.1.50
- Ubuntu Server 14.04LTS Unifi Controller – 192.168.1.60
- Floor 1 Unifi AP – 192.168.1.250
- Floor 2 Unifi AP – 192.168.1.251
- Floor 3 Unifi AP – 192.168.1.252
As part of this project we wanted to turn on the following:
- Windows Server 2012 Network Policy Server – 192.168.1.55
The client also provided the server it’s own server certificate to allow clients to authenticate, and we installed that too.
I will assume you already have Active Directory installed, and you have a server ready to install Network Policy Server which is joined to the appropriate domains.
Oh and feel free to click on any of the screenshots for a bigger picture!
Step 1 – OPTIONAL – Install a Trusted Certificate for Authentication
Update 16 July 2016: An emailer has suggested that if you’ve got an enterprise Windows Certificate Services server setup you shouldn’t need to manually import a certificate, you should be able to do it quite happily via the usual certificate request process. Thanks Anon for the clarification suggestion 🙂
In this particular example the customer had a full and proper PKI infrastructure so they wanted to provide a certificate on the Radius/NPS server which clients could authenticate with. You don’t need to do this step, but if not you’ll have to get users to accept the certificate when they connect or otherwise distribute the certificate.
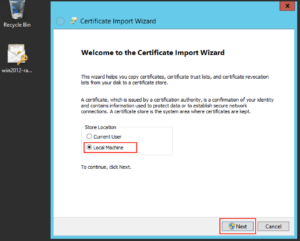
Download the certificate (in this case a .p12) and double click to install and you’ll probably want to install it on the “Local Machine” as opposed to the “Current User”, and click “Next”:
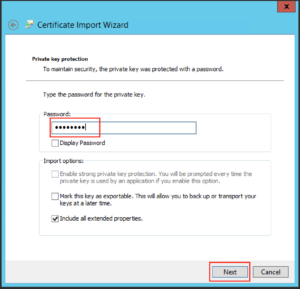
Type the password as appropriate for the file and click “Next”:
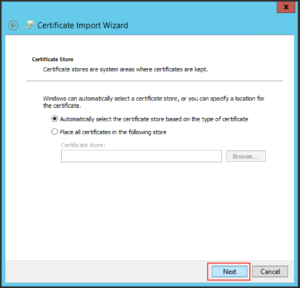
Leave the default on the next screen and click “Next”:
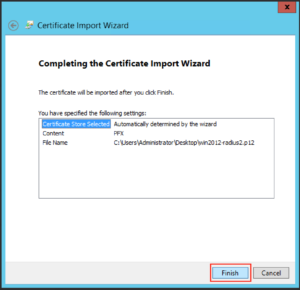
Then click “Finish”
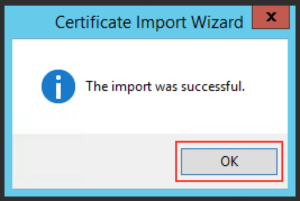
And you should get a message like the following:
Step 2 – Install Microsoft Network Policy Server for Radius & 802.1x
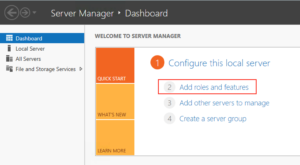
From the Server Manager click “Add Roles or Features”
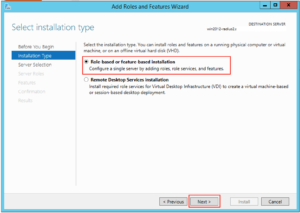
Make sure “Role-based or feature-based installation” is selected and click “Next”
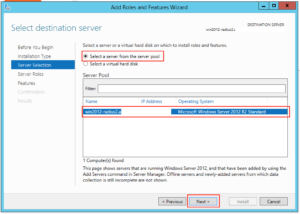
Select the appropriate server in the next screen and click “Next”
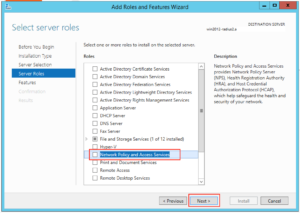
Click on “Network Policy and Access Services”:
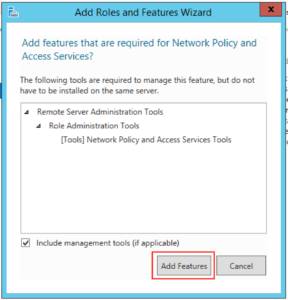
A box like this should pop up, click on “Add Features”:
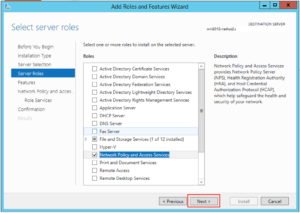
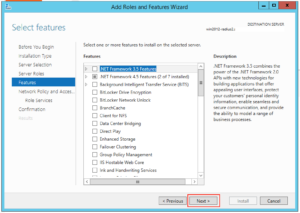
Then click “Next”:
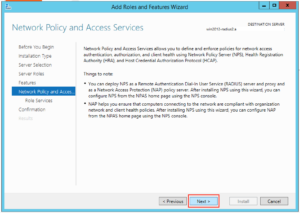
And click “Next” again:
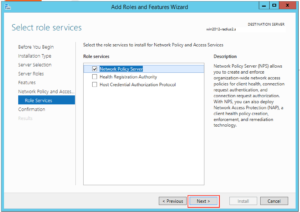
And “Next” again:
And yet again, click “Next”:
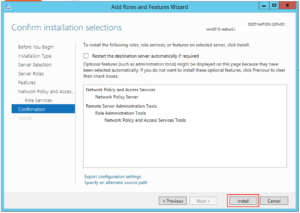
And then click “Install”:
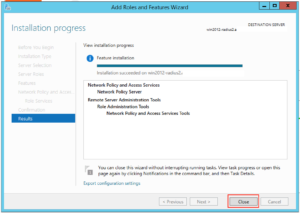
The Wizard should happily go away and install the NPS role for you. When it’s finished press “Close”:
Step 3 – Configure NPS for Unifi Authentication
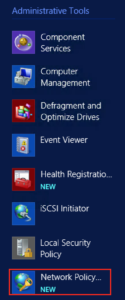
Next we have to set up our server to allow domain authentication via 802.1x for our wireless clients. Click on Start and find the icon for Network Policy Server and click on it:
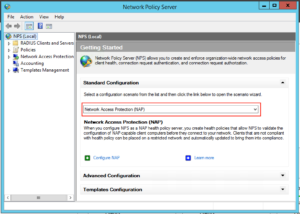
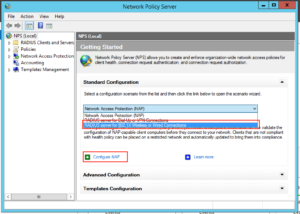
On the window that opens up drop down to “RADIUS Server for 802.1x Wireless or Wired Connections” and then click “Configure NAP”:
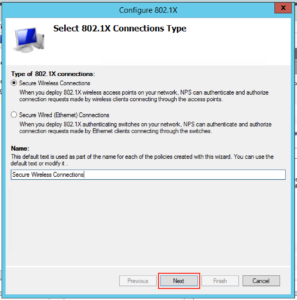
Make sure “Secure Wireless Connections” is highlighted, give it a sensible name and click “Next”:
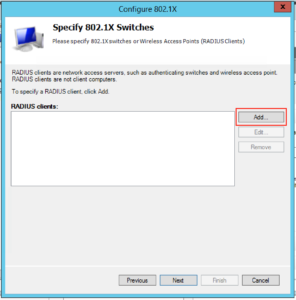
The next screen is where we will add the details for all our Unifi access points, so click “Add”:
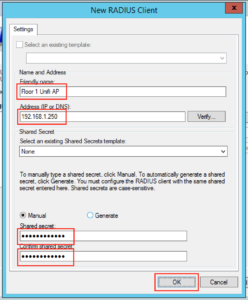
You will want to fill in the client area like this, note our “IP addresses” and “Shared Secret”. You’ll probably want to make the “Shared Secret” some complex string, but for this example I’ve just used “Password123!”. You need to type this into the Unifi controller for each AP. When complete click “Ok”:
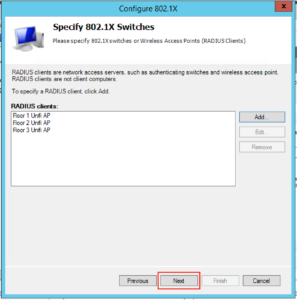
When you’ve completed the process for the rest of your access points your screen will probably look like this, when you’re happy click “Next”:
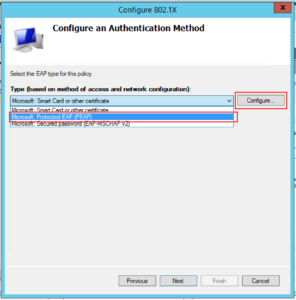
On the next screen you want to drop down the EAP type to “Microsoft: Protected EAP (PEAP)”, and then click “Configure”:
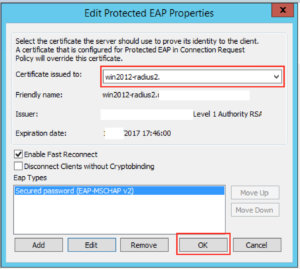
On this screen you will want to select the certificate you want to present to the clients connecting over Wifi. Since in Option 1 I installed a given certificate just for this purpose this is what I need to select, and make sure “Enable Fast Reconnect” is ticked. When you’re happy with it click “Ok”:
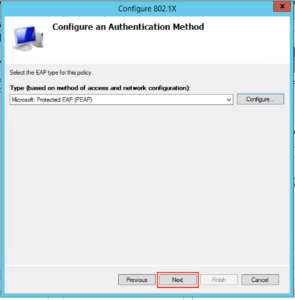
Then click “Next”:
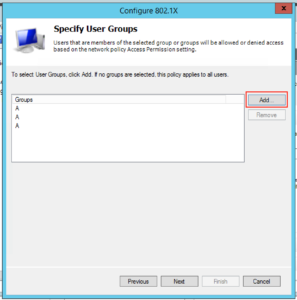
The next screen lets us select which groups we want to allow to authenticate wirelessly, click “Add” and find your appropriate group(s) and when you’re happy click “Next”:
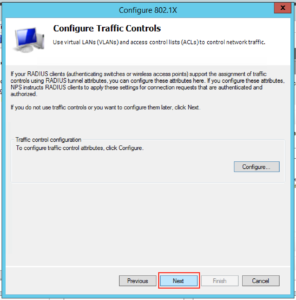
Click “Next” on the following screen since we’re happy with the defaults:
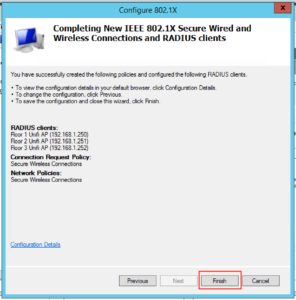
On the next screen click “Finish”:
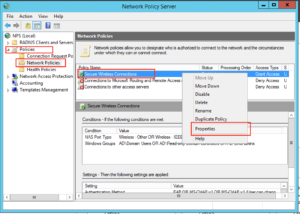
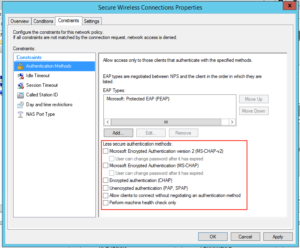
Next we need to disable some insecure options. Under Policies, Network Policies, right click “Secure Wireless Connections” and click “Properties”:
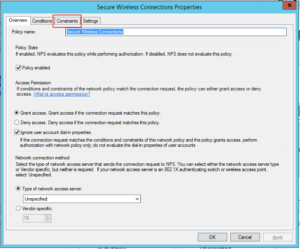
Click on the Constraints tab:
By default we have some insecure methods enabled: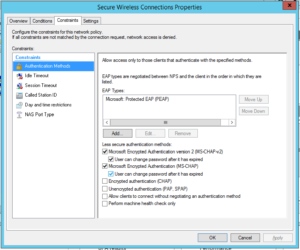
Make sure they are all unchecked, like this and click “Ok”:
Well done! Your NPS server should be ready to go.
Step 3 – Configure Unifi to use NPS
WARNING: Your access points will likely have to re-provision at the end of this step. This means anyone connected to the APs will lose connectivity, if in doubt do it out of hours.
The previous Step was most certainly the biggest one, on Unifi it’s quick and easy.
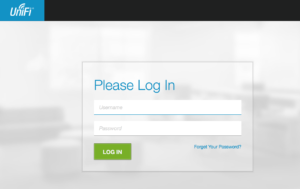
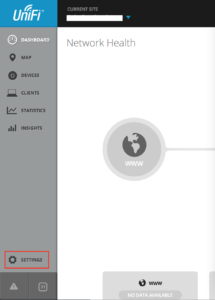
Logon to your controller as normal and click on “Settings”:
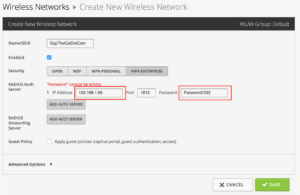
Click on “Create New Wireless Network” or edit an existing one. Fill in the Wireless Network like this, make sure you select WPA-Enterprise and fill in the IP Address and Share Secret of the appropriate details, in our example it looks like the below. When you’re happy click “Save”:
At this point we found that the APs restarted, but not to worry if you’ve come this far it’s obviously going to be ok.
Step 4 – Connect Clients to Unifi Network
Now all that is configuered, you should be ready to attach your clients to the wireless network.
In the optional first step we installed a certificate specifically to allow the Radius server to be trusted by our clients. If you’ve got a proper PKI in place then all your devices should trust the Radius server already, so your steps below may be slightly different than mine (I deliberately didn’t install the certificate for testing purposes).
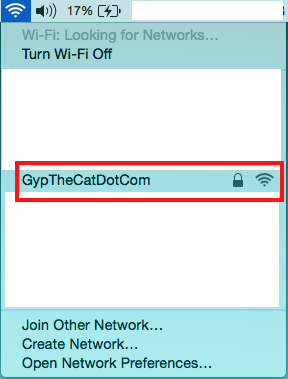
If you search for wireless networks the network you’ve added should show up, click on it:
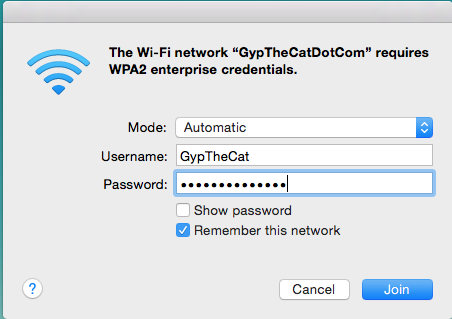
Now enter your network details as normal and click Join:
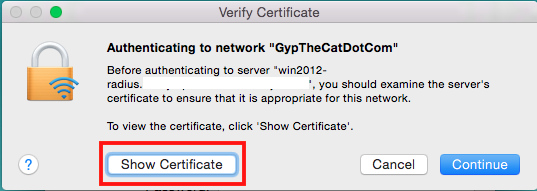
If you DON’T have the certificate trusted by the end point you’ll get a warning like this, click on “Show Certificate” to make sure it’s as it should be:
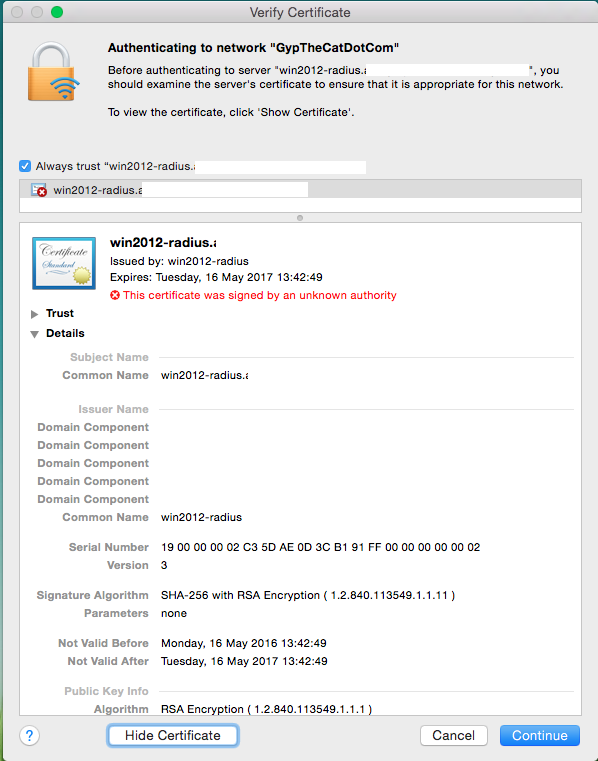
That screen should look something like this (please note I’ve deleted some bits):
You can check that it’s how it should be, and this process will let you install the certificate so it will never ask you again for it.
But again if you’re using a properly trusted certificate by your end point you shouldn’t see this communication!
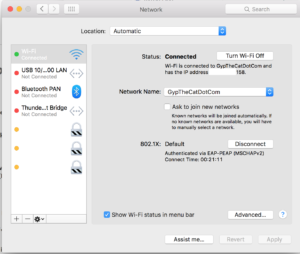
Once you’re connected you should have data like the following, notice it says 802.1X at the bottom:
Well done, you’ve got your Unifi using Radius authentication!



33 Comments
Thanks a bunch for the article! I followed it step-by-step, and had RADIUS set up for about 6 remote sites in under one hour! Your efforts are appreciated.
Hi Roquefort,
Glad it came in useful for someone, and well done! That sounds like a fairly big installation 🙂
Thanks for dropping by!
Gyp
Hello,
Great article! Thank you very much !
I am trying to follow it with a Ubiquiti but I also have a small question …
WIFI company I would like to make (business), I would like that the SSID is hidden.
By cons I have the following questions:
– Should users use their Windows authentication to connect?
– Or should they know the shared key?
I love that the Wifi is automatically configured on users’ PCs (as it should be hidden), they do not know the password for the wifi, etc etc
How can I do ?
Thank you in advance !
Hi Florian,
Glad it came in useful for you!
A couple of points:
– Hiding the SSID really isn’t a good idea from a security perspective. It’s not overly difficult to view hidden SSIDs with the right knowledge.
– Many businesses like Windows Authentication for all the benefits it gives with regards to account termination, passport policies, etc. The exchange is encrypted hence why in the example above you see a certificate request.
– Shared key authentication is good for some purposes, it’s quick and easy to communicate. However many of my customers who use this method then require their users to connect up a VPN to the corporate environment.
– I believe you can push out wireless networks via a GPO and AD https://technet.microsoft.com/en-us/magazine/gg266419.aspx http://www.petenetlive.com/KB/Article/0000923
Best of luck!
Gyp
Thank you, that worked perfect
Hi Deon,
Very glad to hear it. Thanks for taking the time to let me know 🙂
Gyp
Hi there, works great! Thanks a lot.
i`ve some questions.
– i want certificate must be installed on client device when they are try to join the wireless network even they have an username/password. in this configuration, anyone who has a domain username/password they`re successfully joining. it`s increasing risk of network security, if someone who don`t belong my company got one of doamin username/password, he/she will connect to my wireless network without any problem.
Hi Enkhtur,
Thanks for dropping by! Glad it’s working for you.
What you are referring to is Certificate Based authentication, and you probably will want to enable EAP-TLS or PEAP-TLS for this to work and absolutely can be done with Unifi based on this post. Have a look at Microsofts’ own Technet guide https://technet.microsoft.com/en-us/library/cc772401(v=ws.10).aspx. You’ll also probably want to make sure that whichever certificate you use on the NPS server is also trusted by your client machines.
As to the security aspect I agree totally, you’re most certainly adding a second factor in the authentication process! Also if you couple your certificatation service with a way of revoking certificates you can also cut off access pretty quickly and easily.
Gyp
Gyp,
I assume everything through step two can be completed without impacting people using the wireless access?
Thanks,
Doug
Hi Doug,
You assume correctly. Unless of course you have users already using the NPS server that is, and then as long as you don’t remove the existing profile you should be good.
In my experience Step 3 re-provisions the APs so that would obviously be an impact.
Hope this helps,
Gyp
Hey,
Thank you for the great post. I am planning to implement RADIUS at my company and planning to follow this step by step.
My question to you, what about the mobile devices? Will it be able to connect easily?
I am kinda new to this, What can be done about the Guest WI-fi?
Any suggestions or help is appreciated
Thanks
Hi DJ,
Happy to help and thanks for commenting.
Mobile devices should be fine as long as you have valid credentials. If you use a certificate based logon (in addition to the piece above) you will obviously need some method to push the certificate. But yes if you follow the tutorial above you should be fine.
Guest Wifi I’d probably recommend you use the Unifi inbuilt Guest Portal for the wireless network.
Hope this helps!
Gyp
Gyp,
Thank for the info, I now have it working for 60 access points for a school district. One question, we would like to lock down tighter which user groups can authenticate. Initially I left the “Specify User Groups” blank so it applied to all users. I cannot find now by looking a the policies and right-clicking where to make that change.
Thanks,
Doug
Hi Doug,
Fantastic, well done!
Try under – Policies – Network Policies – [Connection Policy Name] Properties – Conditions – Add – User Groups.
Hope this helps,
Gyp
Perfect thanks!!
Quick question: what did you use as the Subject (CN) for a public cert? is it the internal name of the NPS server in the domain (sever.ad.company.com) or some publicly-visible name (radius.company.com), and/or how do you configure what name NPS identifies itself with?
(We want to use public certs on multiple NPS servers).
Hi BPH,
I’m fairly confident the CN was the same of the server, but I’m not 100% sure and no longer have access to the environment to test sorry.
Why not just spin up your own certificate and NPS and have a look?
Thanks for dropping by and sorry I couldn’t be more use,
Gyp
The problem is that public certainly cost money. 🙁 So we don’t want to issue too many.
It may just not be possible to achieve this without prompts. 🙁
Thanks for helping.
Hi BPH,
Thanks for coming back to me.
Couldn’t you just create a self signed certificate for testing? Shouldn’t cost you anything.
Gyp
Ou 3$ per year ? Thats a really big amount bro.
You can use trial certify of Comodo or something like that if you time is priceless.
How could I use this and allow devices that will not let you install a certificate and don’t use AD? Older legacy devices, I want a way to approve access via nps but have tons of these legacy devices that currently just use wpa2 that I have to guard with my life!
Hi Randy,
That sounds like a slightly painful environment 🙂 Will these legacy devices not let you connect at all with an “untrusted” certificate?
Only other option I can think of is to create a WPA2 network without NPS just for these devices with a very long key and potentially MAC Address filtering too. Dependant on how paranoid I was feeling I may also connect them to a firewall so they can only access what they need to on a network level. Granted its not a perfect setup by any means.
Thanks for dropping by and thanks for the comment 🙂
Gyp
Thank you for the tutorial. Although I tried and tried I cannot get this to work.
One major deviation is that I do not wish to use a certificate but CHAP methods to authenticate the various mobile devices and roaming laptops on the network.
Some notes:
* All servers concerned are Server 2012 R2.
* I setup the NPS on the same box running the Unifi Controller software.
* Ran through the wizard like above but deviated as described by me above.
* When testing with NTRadPing utility, I keep getting “could not receive a response from the server”, I have tried 127.0.0.1, localhost and the LAN IP address of the controller server .
Any ideas?
Hi Jaco,
Thanks for visiting. Without seeing your environment I’m a little at a loss sorry.
What I may be tempted to do is to follow the guid above by the letter and then work it backwards? ie get it working and then change it to CHAP? It should at least tell let you know where it starts to break.
The timeout you’re seeing looks like it’s not running, do you have a firewall or anything running on the NPS server?
Hope this helps, let me know,
Gyp
Hi gyp,
have you try to add a linux server as a radius client. i want to setup all of our linux as a radius client. is that possible?
Hi Momar,
Having never tried to connect a Linux Server to Wifi as a Radius client I’m not entirely sure to be honest. However I can certainly imagine this is something Linux devs have done. Ubuntu desktop certainly works as a Radius client.
Personally though I’d much prefer my Linux servers on ethernet!
Thanks for dropping by and sorry I can’t be of more help,
Gyp
Hi Sir,
I have configured Radius server but in my access point it request login page for authentication, what is this login page?
Thanks,
Khalid
Hi Khalid,
Hmmm, are you using the captive portal for authentication on the Unifi?
Gyp
Hi
Thanx for this tuturial, its workning perfectly, exept for one thing, mayby you can help me.
When logging in from laptops and you tick the “use my windows credential” it dont work
But if i manually write it witout the domainname it works
so
domainname\username = dont work
username = works
/Martin Gustafsson
Hi Martin,
Sorry I’m not sure about that one sorry 🙁 Sounds potentially possibly like a GPO setting?
Sorry again and thanks for dropping by,
Gyp
Hello
Thank you for this. I had an issue where after doing all the setup users used their domain credentials and still could not connect to any of the AP, it kept bringing up the login page. Now using your guide one thing i didn’t do was install a certificate.
So what do you suggest, do I generate a self signed certificate and if so do i do it on the Radius server of Active Directory?
Hi Daniel,
Thank you for stopping by!
Personally I would be checking the logs on your NPS server to see if you’re getting any error messages, or check to make sure your pre-shared keys are correct.
Another commenter correctly stated that the certificate shouldn’t be an issue as long as the NPS server is domain joined.
Hope this helps and let me know if you have any further questions, happy to help how I can,
Gyp
This works quite well for me thank you very much, i am using it to authenticate devices that are joined to the domain. But hen i have a couple of devices which when users try to connect to the wireless are required to enter login credentials (even when user enter their credential login fails). this is not how it is supposed to work as the authentication is set to allow domain joined devices.
Can you give me some solution to this as to why these few devices are not authenticating as expected